Blog
House of Muney - Leakless Heap Exploitation Technique
October 8, 2020
Introduction
Exploiting different heap libraries tends to be difficult, complex and requires a deep knowledge of the library itself. Recently, Qualys decided to go back and exploit a 15 year bug in QMail that was thought to unexploitable with some incredible techniques. This exploit uses a very interesting quirk of Malloc and exploit method that had not been seen before, which I have decided to name the House of Muney.
In this article, I wanted to shed more light on the exploitation method that was used by the Qualys researchers to ensure there is a well-documented location for this exploit method. In short, it is broken up into Munmaping part of LibC and to rewrite the symbol table to get code execution. There are two main perks of this technique: this bypasses ASLR entirely and works on mmap chunks in GLibC Malloc.
Just as a fair warning, this article has quite a bit of background knowledge to understand the exploit. If you think you have a good understanding a section, it is recommended you still review the section just to refamilarize yourself with the content. In this article, the following is discussed as background:
- Malloc Chunk (general)
- Mmap and Munmap
- Malloc Mmap Chunks
- ELF Symbol Resolution
The article also comes with a working POC on version 2.31 of Malloc on my Github (mdulin2) at House of Muney if you would like to follow along. Additionally, if you want more security content, take a look at the resources or other blog posts. Now, with the introduction out of the way, let's dive into the technical details.
GLibC Malloc Background
Chunks
Chunks are the main object that users interact with. There are two main states to a chunk: allocated and free. The following picture demonstrates a free chunk:
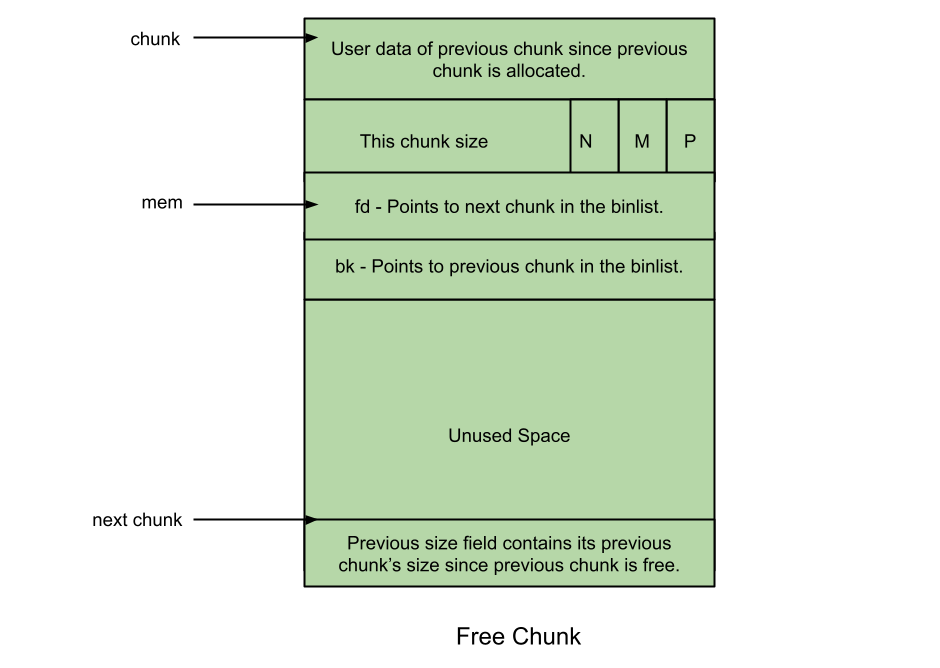
On an allocated (non-free) chunk, the third and fourth field are used as data sections. However, on a free chunk, the third field is used in order to store a pointer to other freed chunks. This field is known as the forward pointer or the Fd field. The fourth field is exactly the same, except that it stores a backwards pointer or bk.
This is a very small background on chunks but is all that is needed for the article. For further information, please to refer to Sploitfun's amazing article about GLibC.
Mmap and Munmap
Mmap is used in order to create a new address mapping in the virtual address space. Mmap is the system call used behind the beginning mapping of all programs and is an extremely low level function (well, it is even a syscall).
Munmap is the opposite of mmap: munmap deletes the mappings for the specified address range. If anything in this range is attempted to be accessed, it is considered an invalid address and results in an access violation. For more information on these low level functions, refer to the man pages.
GLibC Malloc Mmap Chunks
In Malloc, if a requested size is above a certain threshold then a separate call is made to mmap in order to get a new section of memory for this particular chunk. Very large chunks (which will be referred to as Mmap chunks from this point on) are not handled like normal chunks though.
Mmap Chunks Differences
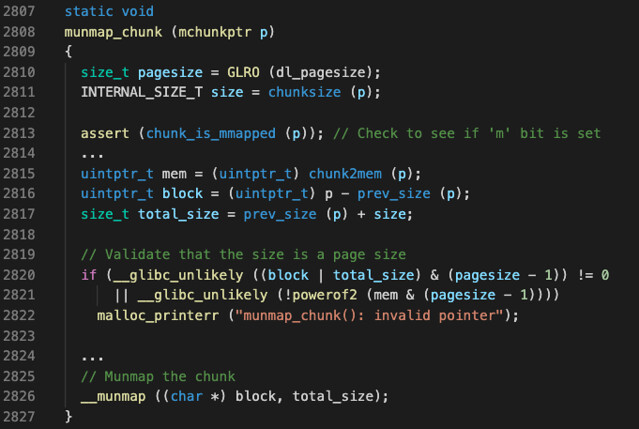
With mmap chunks, the prev_size field is used for part of the chunk that went unused with this specific allocation. The prev_size is added to the size of the mmap chunk to know how much memory to munmap, or free.
The final difference is that the second bit of the size is used in order to determine if this is an mmap chunk or not (the 'M' bit in Figure 1).
Munmap Madness
With the funky handling of mmap chunks in GLibC, it was bound that somebody had done research on this in the past. In a very well-done article by Tukan titled Munmap Madness, the author dives into the possibilities of what can happen with corrupted mmap Malloc chunks. In this article, the author discusses how mmap chunks work, potential exploits and weird quirks about it. For more information on mmap chunks, please refer to his article.
What we are taking from the the Munmap Madness article, is that the author mentions altering the size of an Mmap chunk to trigger the removal (munmap) of a section of memory. The main interests are the other parts of a program, such as a thread stack, LibC and so on. Although altering LibC may be difficult, the focus of this article will be on munmapping a small section of LibC in order to take control of the program later.
Symbol Lookup
With ELF files, one would think that Symbol Lookup would be a trivial task. However, Symbol lookup is vastly complex and takes quite of bit of time to understand. In this article, only the GOT/PLT sections will be briefly discussed and the actual dynamic symbol table lookup process will be briefly discussed later.
PLT and GOT
Have you ever wondered how library functions are magically found without the actual function being defined in the binary? Well, I can tell ya, it is pretty black magic-y!
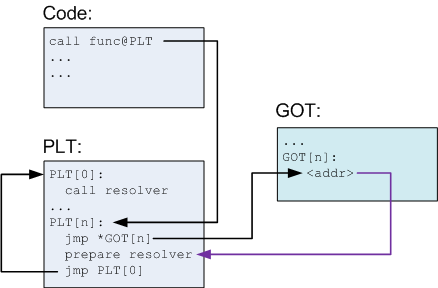
First off, a library function call is replaced with a function stub, known as the Procedure Linkage Table (PLT) at compile time (with dynamic linked binaries, which is the default compilation mode). When this is called, there are two known states: first time and all others.
The first time a call is made, the process is passed to the loader in order to resolve the symbol (more on this process later). This is seen in Figure 3 by the prepare resolver line of code. Once the symbol is resolved, it is added to the Global Offset Table (GOT) for later usage.
The next time that the PLT entry for a function is called, the entry is IN the GOT table, as the resolver has already been set. Because of this, we can skip the resolving process and just use the entry in the GOT table for the symbol.
For more information on the PLT and GOT, please refer to the article by System Overlord and this article by Eli Bendersky.
Symbol Resolving (ld)
Now, here is the black magic-y part: how does the loader know where symbols are located? At a high level, the loader iterates through all loaded ELF file symbol tables until it finds an entry to this specific symbol. The full process for how the symbol resolving process is done is out of the scope of the article but a fair amount of it will be discussed below. For an in-depth explanation on this, please look at GNU Hash ELF Sections.
Game Plan
Whooo... that was a lot of background information just to understand this technique! Now, with the stage set, we will give a high level overview of the attack technique then and then dive into each aspect of the technique individually.
The plan for exploitation is as follows:
- Overwrite mmap chunk size or prev_size.
- Free the mmap chunk (with munmap) to override part of the memory mapping of LibC (
.gnu.hash, .dynsym) - Get mmap chunk over the top of LibC region.
- Rewrite
.gnu.hashand.dynsymsections of LibC ELF. - Call previously uncalled function for code execution.
Altering Mmap Chunk Size
Why?
The purpose of this step is to change the size of the chunk to overlap with LibC. Then, when we free this chunk, it will munmap memory associated with LibC. The fruit of altering the size is only apparent after freeing and reallocating in later steps. But, our main goal is to control a normally read-only section of LibC: .gnu.hash and .dynsym.
Mmap Chunk Review
Mmap chunks have two main components that dictate the addresses to be freed: size and prev_size.
By altering the size of a chunk, we can control the amount of bytes that are unmapped from the point of the original allocation, or going forward. Additionally, the prev_size can be used to munmap chunks going backwards from the original point of allocation. The prev_size field is used for the current chunk with mmap chunks, not for the size of the previous chunk. For the purpose of this exploit, only altering the size is going to be useful though. I wanted to make mention of altering the prev_size because it can be useful in other mmap chunk heap exploits though!
Valid Chunks
For an mmap chunk, the following must to be true:
- Mmap bit must be set (2nd bit of the size metadata)
prev_size + sizemust to be a page size (0x1000 for example)
Chunk Attack Size
The size of the chunk is different on a case by case basis. The important part is that the chunk needs to overlap with the .gnu.hash and .dynsym of LibC in order to rewrite the symbol table entry later on. To see the sizes of these sections, the tool readelf is extremely useful.
In general, the size to overwrite with can be calculated with the following forumla: size_of_chunk = bytes_to_libc + bytes_to_overlap__dynsym. Then, in the next step, when the chunk is freed, LibC (or a different library) will be gone from the virtual address mapping.
Free the Chunk
From the previous step, we have created an mmap chunk that has a size overlapping part of LibC. All of the hard work for this was done! All we have to do is to call free on this corrupted chunk. Now, part of LibC will be unmapped from the virtual address space.
Overlap Chunk with LibC
- mmap_threshold
- Heap Locations
mmap_threshold
Very large chunks (mmap chunks) are assigned in a completely different way in order to prevent fragmentation with one-off extremely large chunks. The mmap_threshold is used in order to determine the largest chunk size that should go onto the standard section of the heap. In order to allocate an mmap chunk, the size has to be larger than the mmap_threshold.
When an mmap chunk is freed, the size of the chunk is checked with the previously largest freed mmap chunk (or the default size), which is known as the mmap_theshold. If the size being freed is larger, then the mmap_threshold is updated. For example, mmap_theshold is 0x100000. If we free a chunk of size 0x200000 then the mmap_theshold gets updated to 0x200000.
If the size of the chunk being allocated is NOT larger than the mmap_threshold value, then the chunk will be put into the normal heap section instead of getting a special mmap chunk.
Heap Locations
The heap locations is just about if the physical spot in memory is actually available or not. This can be fixed with proper heap feng shui. Heap Feng Shui is the process of arranging the heap memory in the exact way that an attacker needs.
Getting the mmap chunks directly behind LibC just requires some knowledge of how these chunks are allocated. From empirical observations of my own and Tukan, here is what the common ordering from (at least, on my 16.04 Ubuntu instance):
- Memory above LibC and below the loader
- Below the mmap_base (practically, just below LibC). Allocations are made consecutively below each other.
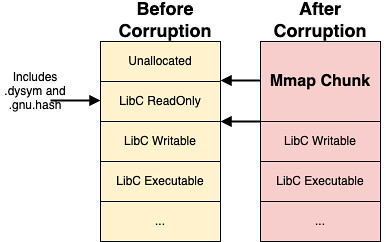
Now that the chunk has been allocated into the proper location (over LibC) we can move on to the next step. A visual diagram of the before and after can be seen above in Figure 4.
NOTE: Mmap initializes all memory to be NULL. So, all of the values from the original mapping of LibC (that we munmapped) are gone.
Rewriting LibC .gnu.hash and .dynsym
Recall, from the previous step, we control a chunk that overlaps with what used to be the beginning of LibC.
Now begins the real fun :) Rewriting the symbol resolution process! In order to rewrite the parts of LibC, there are multiple ways to go about it:
- Copy in the LibC sections byte for byte. Then, make several small changes to the symbol table. This is the technique that Qualys chose to use.
- Completely reverse the process and deterministically figure out what to write.
- Step through the code in GDB to understand the loader and write only what is needed.
After ruling out the copy-paste method of 1 and the hard reversing of 2, I decided to go with option 3. Although option 1 would have worked, option 3 looked new and interesting to learn about!
What Is Actually Needed?
First, let's setup a nice debugging ENV. Viewing assembly by itself is very complex and tedious to look at. So, for the purpose of this, having the LibC source code attached is really nice. This can be done by downloading the source code of the version of LibC you are trying to debug and running the following command in GDB: gdb> dir /libc/source/location. This is to set GDB to look for source code at the location that is set.
After stepping through a program with the source code hooked up, I realized that there were 4 main locations that needed to be set (from empirical testing):
- l_gnu_bitmask
- l_gnu_buckets
- l_gnu_chain_zero
- Symbol Table Entry
Symbol Table Entry Locating
After setting up a version of LibC with debugging symbols and source code attached, the reversing was ready to go. To do the actual debugging, I had two windows open: the modified version (corrupted) and one with the regular flow (non-corrupted). The corrupted version will only have NULLs in this section to start with because mmap initializes all memory to NULL. Figure 5 shows this setup:

After reversing the symbol table resolving process for a while, it became apparent that the function doing the actual symbol resolving (that handled parts of LibC that we corrupted) was the function do_lookup_x. This is called from the trampoline function _dl_runtime_resolve, which is the first thing called from the PLT stubs.
The function do_lookup_x
iterates all ELF files until it finds the one with the proper symbol. Step through do_lookup_x until LibC comes up as the ELF entry to look for the symbol to resolve. Once there, I did the following steps (on repeat), until the symbol resolution process worked again:
- Found a LibC value that is corrupted (this is going to be NULL instead of proper value). This is shown in the right terminal in Figure 5.
- Found proper value in non-corrupted version of the binary with a regular symbol resolution process. This is shown in the left terminal in Figure 5.
- Wrote proper value to the same exact location in LibC (corrupted version) via the overlapping mmap chunk that we allocated in step 3. Now, this step in the symbol resolution process will start working again.
- Repeat steps 1-3 until the entire symbol resolution process is working, as expected.
Symbol Tables
Once the entry has been located, faking the symbol table entry is very simple. Symbol table entries are made up of the following format:
typedef struct {
        Elf64_Word      st_name;
        unsigned char   st_info;
        unsigned char   st_other;
        Elf64_Half      st_shndx;
        Elf64_Addr      st_value;
        Elf64_Xword     st_size;
} Elf64_Sym;
It is recommended that the entire symbol table entry is just copied into memory so that the rest of the lookup process looks as expected. There is ONE extremely important field to point out though: st_value.
Assuming this is a relative offset entry (which can be altered with the type field), edit the st_value to be the offset of whatever function you would like to call! For a situation where a function is being resolved, we can set this to point to ANY function, including system or a one_gadget.
Function Call
What can we call? We can call ANY function (or in the middle of a function) that is within a close proximity of the symbol we overwrote. Practically, anything within the same relative address space could be called, even functions/symbols from other libraries loaded close by (although, I have not tested this myself, this should work). All we need to know is a relative offset from LibC (or the library we are overwriting).
The function that is going to be called must be a symbol table overwritten within a library. Additionally, this function must not have been called before. This is because the symbol resolving process is what we are overriding, which only happens the first time a symbol in a dynamically linked library is resolved (recall this from the PLT/GOT section in the background).
This can be used to call system, a one_gadget, another function or be the start of a ROP chain. At this point, this is where all of the hard work passes off! :)
Thoughts
Overall, this technique is pretty devastating but is extremely technical and tedious. Below are the pros and cons of this technique.
Pros
Very large chunks (mmap) are typically not discussed much with heap exploitation techniques. House of Muney is an opening into this realm.
Here are some pros to the technique:
- Bypasses address space layout randomization (ASLR) because symbol tables can have relative offsets.
- Requires NO leaks.
- A single buffer overflow can be enough to start this exploitation method.
- Mmap chunk heap exploitation technique, which is not discussed very much. House of Muney is an opening into this realm.
Cons
- This vulnerability does require the ability to overwrite the size of a mmap chunk.
- Known relative location of the overwritten chunk. In some scenarios, this may need to be brute forced.
- Full RELRO or static compilation would prevent this attack from being successful because all symbols are loaded prior to the program running (no lazy symbol resolution).
- The LibC (or other library) version being attacked must be known or brute forced in order to have the offsets work properly.
- Fairly good control over the size of allocations in order to get mmap chunks in the proper locations
POC
Want to see an actual POC? As part of documenting this technique, the Github repo House of Muney has everything needed in order to understand this technique. In particular, it has a well-commented proof of concept, a pre-made pwntools script to load the file with the non-optmized LibC version with debugging symbols and a nice compilation script. If you really want to understand the technique, it is recommended that you play with this POC. It should be noted that one of the values (to be written) is skipped because it is not completely necessary to write, but should be accounted for when indexing.
Conclusion
Overall, this is an incredible technique for gaining code execution, although highly technical and complicated. In the future, I would love to see more techniques about exploiting LibC with mmap chunks and gaining code execution in different/interesting ways. I hope you enjoyed the article and learned something interesting about heap exploitation and computers today.
Major S/O's to the Day[0] podcast for putting the Qmail exploit on my radar, Tukan for his work on malloc mmap chunks, Georgi Guninski for his QMail finding 15+ years ago, both Dinesh Shetty and iamalsaher for the reviews and Qualys for posting this technique in their exploit. Feel free to reach out to me (contact information is in the footer) if you have any questions or comments about this article. Cheers from Maxwell "ꓘ" Dulin.